


The Professional Guide to Tanning Lamp Replacement: Maximizing UV Performance
A tanning bed is only as effective as its weakest bulb. If your sessions are dragging or results feel inconsistent, your equipment is likely overdue for a performance calibration. It's a common frustration for professionals and home users alike. You shouldn't have to guess whether an F71 or F73 lamp is the right fit, nor should you worry about wasting money on high-output bulbs that your ballast can't support. We understand the need for factual precision when it comes to UV performance. Proper tanning lamp replacement is about more than just swapping glass; it's about restoring the specific UV ratio your bed was engineered to deliver.
You want 100% equipment compatibility and a return to peak bronzing efficiency. This guide provides the technical depth needed to identify, select, and install the perfect replacement lamps for your specific model. We'll examine the nuances of lamp life (and how to extend it), clarify the differences between standard and hybrid technologies, and walk you through a methodical installation process. By the end of this article, you'll have the confidence to upgrade your setup and ensure every session delivers the reliable, high-quality results your equipment was built for.
Key Takeaways
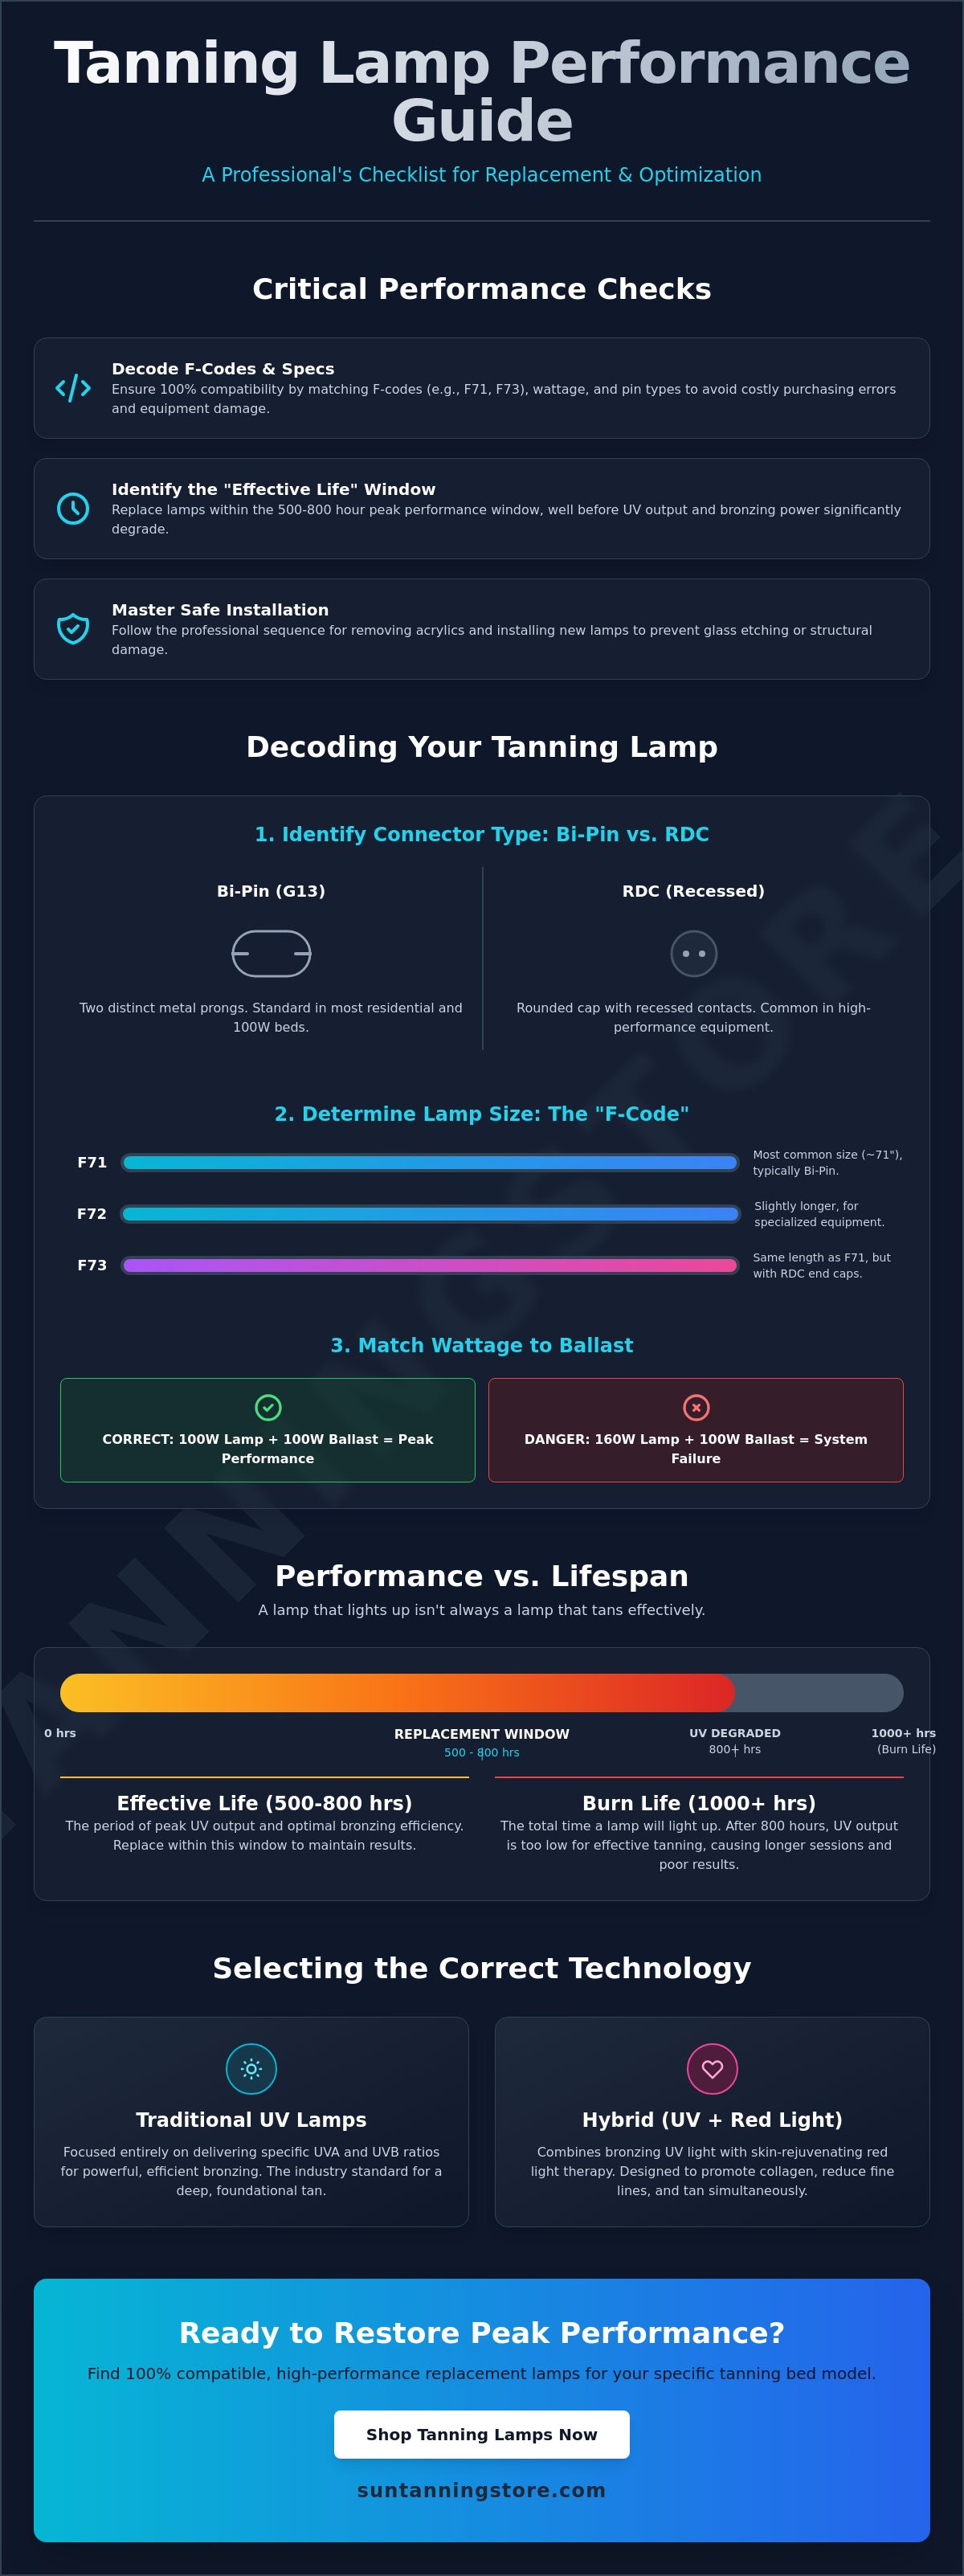
- Decode technical etchings and "F" codes (such as F71 and F73) to guarantee 100% equipment compatibility and avoid costly purchasing errors.
- Identify the critical 500-800 hour "Effective Life" window to schedule a tanning lamp replacement before UV output and bronzing power significantly degrade.
- Compare traditional UV lamps with advanced Hybrid (UV + Red Light) options to optimize your bed's specific bronzing and skin-rejuvenation capabilities.
- Master the professional sequence for safely removing acrylics and installing lamps without risking glass etching or structural equipment damage.
- Maximize UV transmission through proper post-installation cleaning and methodical maintenance of the acrylic shield to protect your new performance investment.
Identifying Your Tanning Lamps: Deciphering Sizes, Wattage, and Pin Types
Precision starts at the end of the tube. Before you commit to a purchase, you must verify the technical specifications of your current equipment. Technical data is typically stamped directly onto the glass near the base of the bulb. This etching is your blueprint for a successful tanning lamp replacement. It usually includes the manufacturer's name, the wattage, and a specific "F" code. If the text has faded over time due to heat exposure, try shining a high-intensity flashlight at a sharp angle across the glass surface to reveal the remaining indentations.
Matching wattage to your bed's ballast capacity is a non-negotiable safety requirement. Your bed's ballast is engineered to regulate a specific amount of electrical current. Installing a 160W lamp into a system designed for 100W lamps will likely result in a "no-start" condition or, in some cases, an electrical meltdown. Understanding tanning lamp technology helps you realize that the lamp and ballast work in a symbiotic relationship. Standard lamps usually operate at 80W or 100W, while High Output (HO) and Very High Output (VHO) lamps require specialized, high-capacity ballasts to handle their increased energy demands. Don't assume a higher wattage bulb will simply "tan better" in a low-wattage bed; it will likely just damage your electronics.
Bi-Pin vs. RDC: Identifying Your End Caps
The connector type is the most immediate physical indicator of equipment compatibility. Bi-Pin (G13) lamps feature two distinct metal prongs protruding from each end. These are standard in most residential units and 100W commercial beds. Conversely, Recessed Double Contact (RDC) ends appear as a single, rounded black cap with metal contacts tucked inside. These are common in high-performance, high-pressure commercial equipment. You cannot interchange these types. The lamp holders are physically different and wired specifically for one connector style. Forcing the wrong type into a socket can crack the lamp or strip the holder.
The F-Code Length Chart
The "F" code refers to the lamp's nominal length. While it doesn't always translate to exact inches, it's the industry's universal sizing language for a tanning lamp replacement.
- F71: This is the most common size, measuring approximately 71 inches. These are the gold standard for the majority of residential and standard commercial beds.
- F72: Slightly longer than the F71, these are often found in specialized equipment that requires a tighter fit within the canopy.
- F73: These lamps are specifically designed with RDC end caps. They are roughly the same length as an F71, but the RDC cap adds the necessary extension for high-output commercial sockets.
Performance vs. Lifespan: When to Schedule a Tanning Lamp Replacement
A lamp that lights up isn't necessarily a lamp that tans. This is the most common misconception in the industry. While a standard UV bulb might have a "burn life" of 1,000 hours or more before the filament fails, its "effective life" is significantly shorter. For most professional-grade equipment, the peak performance window sits between 500 and 800 hours of use. After this point, the UV output drops below the threshold required for efficient bronzing. If you notice your sessions are stretching longer just to maintain a base tan, you've already missed the ideal window for a tanning lamp replacement.
Relying on aging lamps doesn't just hurt session efficiency; it impacts your equipment's health. As phosphors degrade, they often create more heat and less light. This thermal buildup can stress your ballasts and cause tanning bed acrylics to become brittle or yellow over time. To stay ahead of these issues, many professional operators use a UV light meter to track output scientifically. By measuring the milliwatts per square centimeter (mW/cm²) when bulbs are new and comparing that to monthly readings, you can identify the exact moment performance dips by 20% to 30%, which is the industry standard for replacement.
Effective Life vs. Burn Life
The physics inside the glass tube are constant. Over time, the internal phosphor coating is bombarded by electrons, causing it to "plate out" or lose its ability to emit UV radiation. Premium brands like Wolff and ProSun are engineered for stability, but even high-quality components have limits. While the bulb still illuminates, the specific UVA and UVB ratios change. This shift is why understanding the dangers of indoor tanning is critical; users often overexpose themselves in older beds to compensate for weak bulbs, increasing risks without gaining the desired results. If your lamps have reached the 800-hour mark, it's time to browse our selection of replacement tanning lamps to restore original power.
Signs Your Lamps Need Immediate Attention
Visual cues often precede total failure. Check your lamps for these specific indicators during your weekly cleaning routine:
- Darkened End-Caps: Heavy blackening at the ends of the tube indicates the cathode is sputtering, a sign the lamp is near total failure.
- Glass Etching: A cloudy or "frosted" appearance inside the glass suggests the phosphor has been depleted.
- Ignition Delays: If bulbs flicker or take several seconds to "catch" after the timer starts, the lamp's internal gas mixture is likely compromised.
- Excessive Heat: If the bed feels significantly hotter than usual but the tan is weaker, the energy is being converted to infrared heat rather than UV light.
Monitoring these factors ensures you maintain a high level of customer satisfaction. Inconsistent results lead to client churn, whereas a proactive tanning lamp replacement schedule keeps your equipment performing like it did on day one.
Selecting the Correct Technology: UV, Hybrid, and Red Light Options
Performance is never accidental. It is the result of matching specific lamp technologies to your equipment's capabilities and your clients' expectations. Selecting the right tanning lamp replacement involves more than finding a bulb that fits the socket; it requires an understanding of how different spectral outputs interact with the skin. Today's market has moved beyond simple UV tubes, offering specialized options that can transform a standard tanning session into a comprehensive wellness treatment. Your choice should be dictated by whether you need to build a base tan, provide deep bronzing, or offer skin rejuvenation benefits.
UVA vs. UVB Ratios: What Do the Percentages Mean?
UVB radiation is responsible for stimulating melanin production, effectively "building" a base tan. UVA radiation then oxidizes that melanin to produce the dark, bronzed color. Most professional lamps are categorized by their UVB percentage.
- High UVB (5% to 7%): These are often labeled as "starter" or "base-building" lamps. They are ideal for clients with lower base tans who need to jumpstart the tanning process.
- High UVA (1% to 3% UVB): Frequently marketed as "Bronzing Lamps," these prioritize the darkening of existing melanin. They provide a deeper, more immediate color but are less effective at building a new tan from scratch.
Upgrading to Hybrid or Red Light Therapy
The industry is shifting toward multi-functional equipment. Hybrid technology, found in systems like RenuvaTan and RedSun, combines traditional UV phosphors with red light therapy (633nm). This spectrum is designed to stimulate collagen production and improve skin elasticity while the UV components handle the tanning. It's a premium offering that justifies higher session prices. Many ProSun units, such as the Onyx or Jade series, are specifically engineered to utilize these hybrid lamp configurations to maximize the biological response of the skin.
Before initiating a tanning lamp replacement with hybrid or red light (collagen) lamps, you must verify your ballast compatibility. While most 100W hybrid lamps are physically interchangeable with standard UV bulbs, the heat signatures can vary. Red light therapy units operate at different intensities, so ensuring your bed's airflow can manage the thermal output of a technology upgrade is essential for protecting your investment and ensuring equipment longevity.
How to Replace Tanning Bed Bulbs: A Professional Step-by-Step Guide
Execution is everything. A methodical tanning lamp replacement requires more than just physical strength; it demands technical precision and strict adherence to safety protocols. Before you begin, you must disconnect the main power supply. Simply turning off the timer isn't enough to eliminate the risk of electrical shock. Allow the unit to cool for at least 20 minutes. This prevents thermal shock to the glass and protects your hands from burns. Precision and patience during this phase protect both the technician and the equipment.
Step 1-4: Access and Removal
Acrylic management is the most delicate part of the process. Carefully remove the fasteners or trim strips securing the tanning bed acrylics. These sheets are prone to cracking if flexed too aggressively. Once removed, set them on a flat, padded surface. This is a critical maintenance window often overlooked by amateurs. Follow these specific removal protocols:
- Underside Cleaning: Clean the bottom of the acrylic mask while it's out; dust buildup here can block up to 10% of UV transmission.
- Bi-Pin Rotation: Rotate Bi-Pin lamps 90 degrees until the pins align with the vertical slot in the holder, then lift straight out.
- RDC Compression: For RDC lamps, push the tube toward one end to compress the spring-loaded socket, allowing the opposite end to clear the holder.
- Tombstone Inspection: Inspect the "tombstones" (lamp holders) for signs of discoloration or melting. Brittle holders cause poor electrical contact and premature lamp failure.
Step 5-8: Installation and Testing
The secret to long-term performance is the starter. You should replace your S12 or K11 starters every time you perform a tanning lamp replacement. Old starters can cause "hard starts," which strip the cathode of its emissive coating and shorten the life of your new bulbs by hundreds of hours. Seat each new lamp firmly in the socket. For Bi-Pin models, ensure you feel the distinct "click" as the pins lock into place. If you need high-quality components for this project, you can buy replacement tanning lamps and starters directly from our authorized inventory to ensure 100% compatibility.
After all lamps and starters are seated, reinstall the acrylics and restore power. Perform a brief five-minute "burn-in" test. Observe the lamps for consistent ignition and any unusual flickering. New lamps may exhibit slight "swirling" in the gas during the first few minutes of operation; this is a normal physical reaction and should stabilize quickly. This methodical approach ensures your equipment returns to service at peak efficiency without the risk of preventable component damage or session downtime.
Maximizing Your Investment: Post-Replacement Maintenance
The technical work doesn't end once the last bulb is seated. To protect your investment and ensure the longevity of your equipment, you must implement a rigorous post-installation maintenance protocol. A successful tanning lamp replacement is only as good as the environment in which the lamps operate. Contaminants left on the glass or poor airflow can prematurely age your new components, leading to a rapid decline in UV output and inconsistent bronzing results for your clients.
Start by addressing the physical state of the lamps. During installation, it's nearly impossible to avoid leaving skin oils or fingerprints on the glass tubes. These oils create "hot spots" that can etch the glass or cause uneven phosphor degradation when the lamps reach operating temperature. Use a lint-free cloth and a specialized tanning bed sanitizer to wipe down every lamp before you reinstall the acrylics. This simple step ensures the glass remains clear and the UV radiation remains unobstructed from day one.
Cleaning and Dust Management
Dust is the silent enemy of UV performance. Accumulated debris on the lamps, reflectors, and the underside of the tanning bed acrylics can reduce your total UV output by up to 10%. This is a significant loss of efficiency that forces longer session times and increases electrical costs. Establish a schedule to clean the internal components every 100 hours of operation. While you have the unit open, inspect the cooling fans. New lamps generate specific heat signatures; if your fans are clogged with dust, the internal temperature will rise, which can lead to ballast failure and a shortened lifespan for your tanning lamp replacement.
The 'New Lamp' Break-In Period
New lamps are at their most volatile during the first 50 hours of use. During this "break-in" period, lamps can be up to 20% more intense than their stabilized rating. It's a critical safety issue that requires immediate adjustment of your session timers. To prevent overexposure and ensure client safety, professional operators typically reduce session times by 20% for the first few dozen hours of a new lamp's life. This allows the gas mixture and phosphors to stabilize without risking skin damage.
Finally, don't forget the administrative side of maintenance. Reset your bed's hour meter immediately after installation and log the date in your maintenance records. This data is the only way to accurately track the 500-800 hour "Effective Life" window we discussed earlier. Accurate logging prevents you from running lamps past their peak performance or replacing them too early. Ready to restore your bed's power? Browse our full selection of replacement tanning lamps to find the perfect match for your equipment.
Restore Peak Bronzing Performance Today
Your equipment is an investment in consistent, high-quality results. By mastering the technical nuances of lamp identification and adhering to the 500-800 hour effective life window, you ensure your sessions remain productive and safe. Remember that a successful tanning lamp replacement requires attention to detail beyond the bulbs themselves. Replacing your starters and maintaining pristine acrylic transparency are the final steps in reclaiming the original power of your unit.
We are here to simplify the logistics of your next upgrade. As an authorized distributor for industry leaders like Wolff, ProSun, and Radiance, we provide the factual precision and technical support you need for a seamless transition. We offer free shipping and comprehensive damage insurance on all lamp sets to guarantee your order arrives ready for installation. Shop Premium Replacement Tanning Lamps at Sun Tanning Store to benefit from our expert compatibility checks and competitive logistics. Take control of your UV output and give your equipment the professional calibration it deserves.
Frequently Asked Questions
How often should I replace my tanning lamps?
You should schedule a tanning lamp replacement every 500 to 800 hours to maintain original bronzing power. While bulbs may continue to illuminate for 1,000 hours or more, the UV output degrades significantly after the 800-hour mark. Running lamps past their effective life forces longer session times and reduces overall equipment efficiency.
Can I mix different brands of lamps in the same tanning bed?
Mixing brands is technically possible but professionally discouraged. Different manufacturers use unique phosphor blends, which results in varying UV spectra and intensities across the tanning surface. This inconsistency can lead to uneven tanning results or "striping" for the user. For a uniform, predictable tan, it's best to replace the entire set with identical lamps.
What is the difference between F71 and F73 tanning bulbs?
The primary difference is the end cap and connector type. F71 lamps utilize a Bi-Pin (G13) connector, which is the standard for most residential and entry-level commercial units. F73 lamps are designed with Recessed Double Contact (RDC) ends, typically found in high-output commercial beds. These types are not interchangeable because the lamp holders are physically different.
Do I really need to replace my starters every time I change bulbs?
Yes, replacing starters is a critical step in protecting your new investment. Starters are mechanical switches that wear out over time; a failing starter can cause "hard starts" that strip the cathode of its emissive coating. This damage can shorten your new lamp's life by up to 25% within the first few weeks of operation if the starter fails to ignite the lamp quickly.
Why are my new tanning lamps flickering or dark at the ends?
Flickering typically indicates a faulty starter or a lamp that isn't seated properly in the socket. If new lamps show immediate dark rings at the ends, it often suggests a ballast that is failing or a wattage mismatch between the lamp and the bed's electrical system. Ensure all pins are locked securely into the tombstones to maintain a solid electrical connection.
How much does it cost to replace all the lamps in a commercial bed?
Total cost depends on the lamp technology and the number of sockets in your equipment. Standard 100W lamp sets are the most economical option, while High Output (HO) or Hybrid (UV + Red Light) sets require a larger investment due to their specialized phosphors. Because these are technical components, prices fluctuate based on manufacturer availability and regional shipping logistics.
Are tanning lamps and regular fluorescent bulbs interchangeable?
No, tanning lamps and standard fluorescent bulbs are not interchangeable. Tanning lamps are engineered with specialized UV-transmitting glass and internal phosphors that emit UVA and UVB radiation. Standard household bulbs are specifically designed to block UV light for safety and will provide zero tanning value, even if they physically fit the socket.
How do I safely dispose of old tanning bed lamps?
Tanning lamps contain trace amounts of mercury and must be handled as hazardous waste. It is illegal in many jurisdictions to dispose of them in regular trash. You should contact a local recycling center or a specialized hazardous waste facility to ensure they are processed according to environmental regulations. Proper disposal is a non-negotiable part of a tanning lamp replacement project.