


How to Replace Tanning Bed Lamps: The Ultimate 2026 Maintenance Guide
Your tanning bed might look operational, but if your lamps have surpassed their peak hours, you're essentially charging for a light show rather than a professional tan. Faded UV output is the primary cause of customer dissatisfaction and lost revenue. Learning how to replace tanning bed lamps is the single most effective way to protect your equipment ROI and ensure consistent results. It's more than a simple bulb swap; it's a necessary technical calibration for your machine.
We understand the hesitation many feel when approaching this task. The fear of cracking an expensive acrylic shield or the frustration of ordering the wrong size (such as the common confusion between F71 and F73 lengths) can make maintenance feel high-risk. This guide eliminates that uncertainty. You'll master the technical process of identifying, removing, and installing tanning lamps to restore salon-quality UV performance. We'll provide a structured walkthrough of the correct replacement schedule, shield handling techniques, and pin alignment to ensure a successful swap without equipment damage. By the end of this manual, you'll have the confidence to maintain your unit's peak performance and provide the fast, reliable results your clients expect.
Key Takeaways
- Identify the "effective life" of your lamps to ensure you aren't running depleted bulbs that fail to deliver professional tanning results.
- Navigate complex technical specifications, including wattage ratings and the critical distinctions between Bi-Pin and RDC lamp end caps.
- Master the safe handling of delicate acrylic shields while learning exactly how to replace tanning bed lamps to restore full UV output.
- Diagnose common electrical failures, such as the "one lamp out" mystery, by distinguishing between bad starters and failing ballasts.
- Secure equipment longevity by sourcing professional-grade lamps from authorized distributors and adhering to state-specific mercury recycling protocols.
Determining When to Replace Tanning Bed Lamps for Maximum UV Output
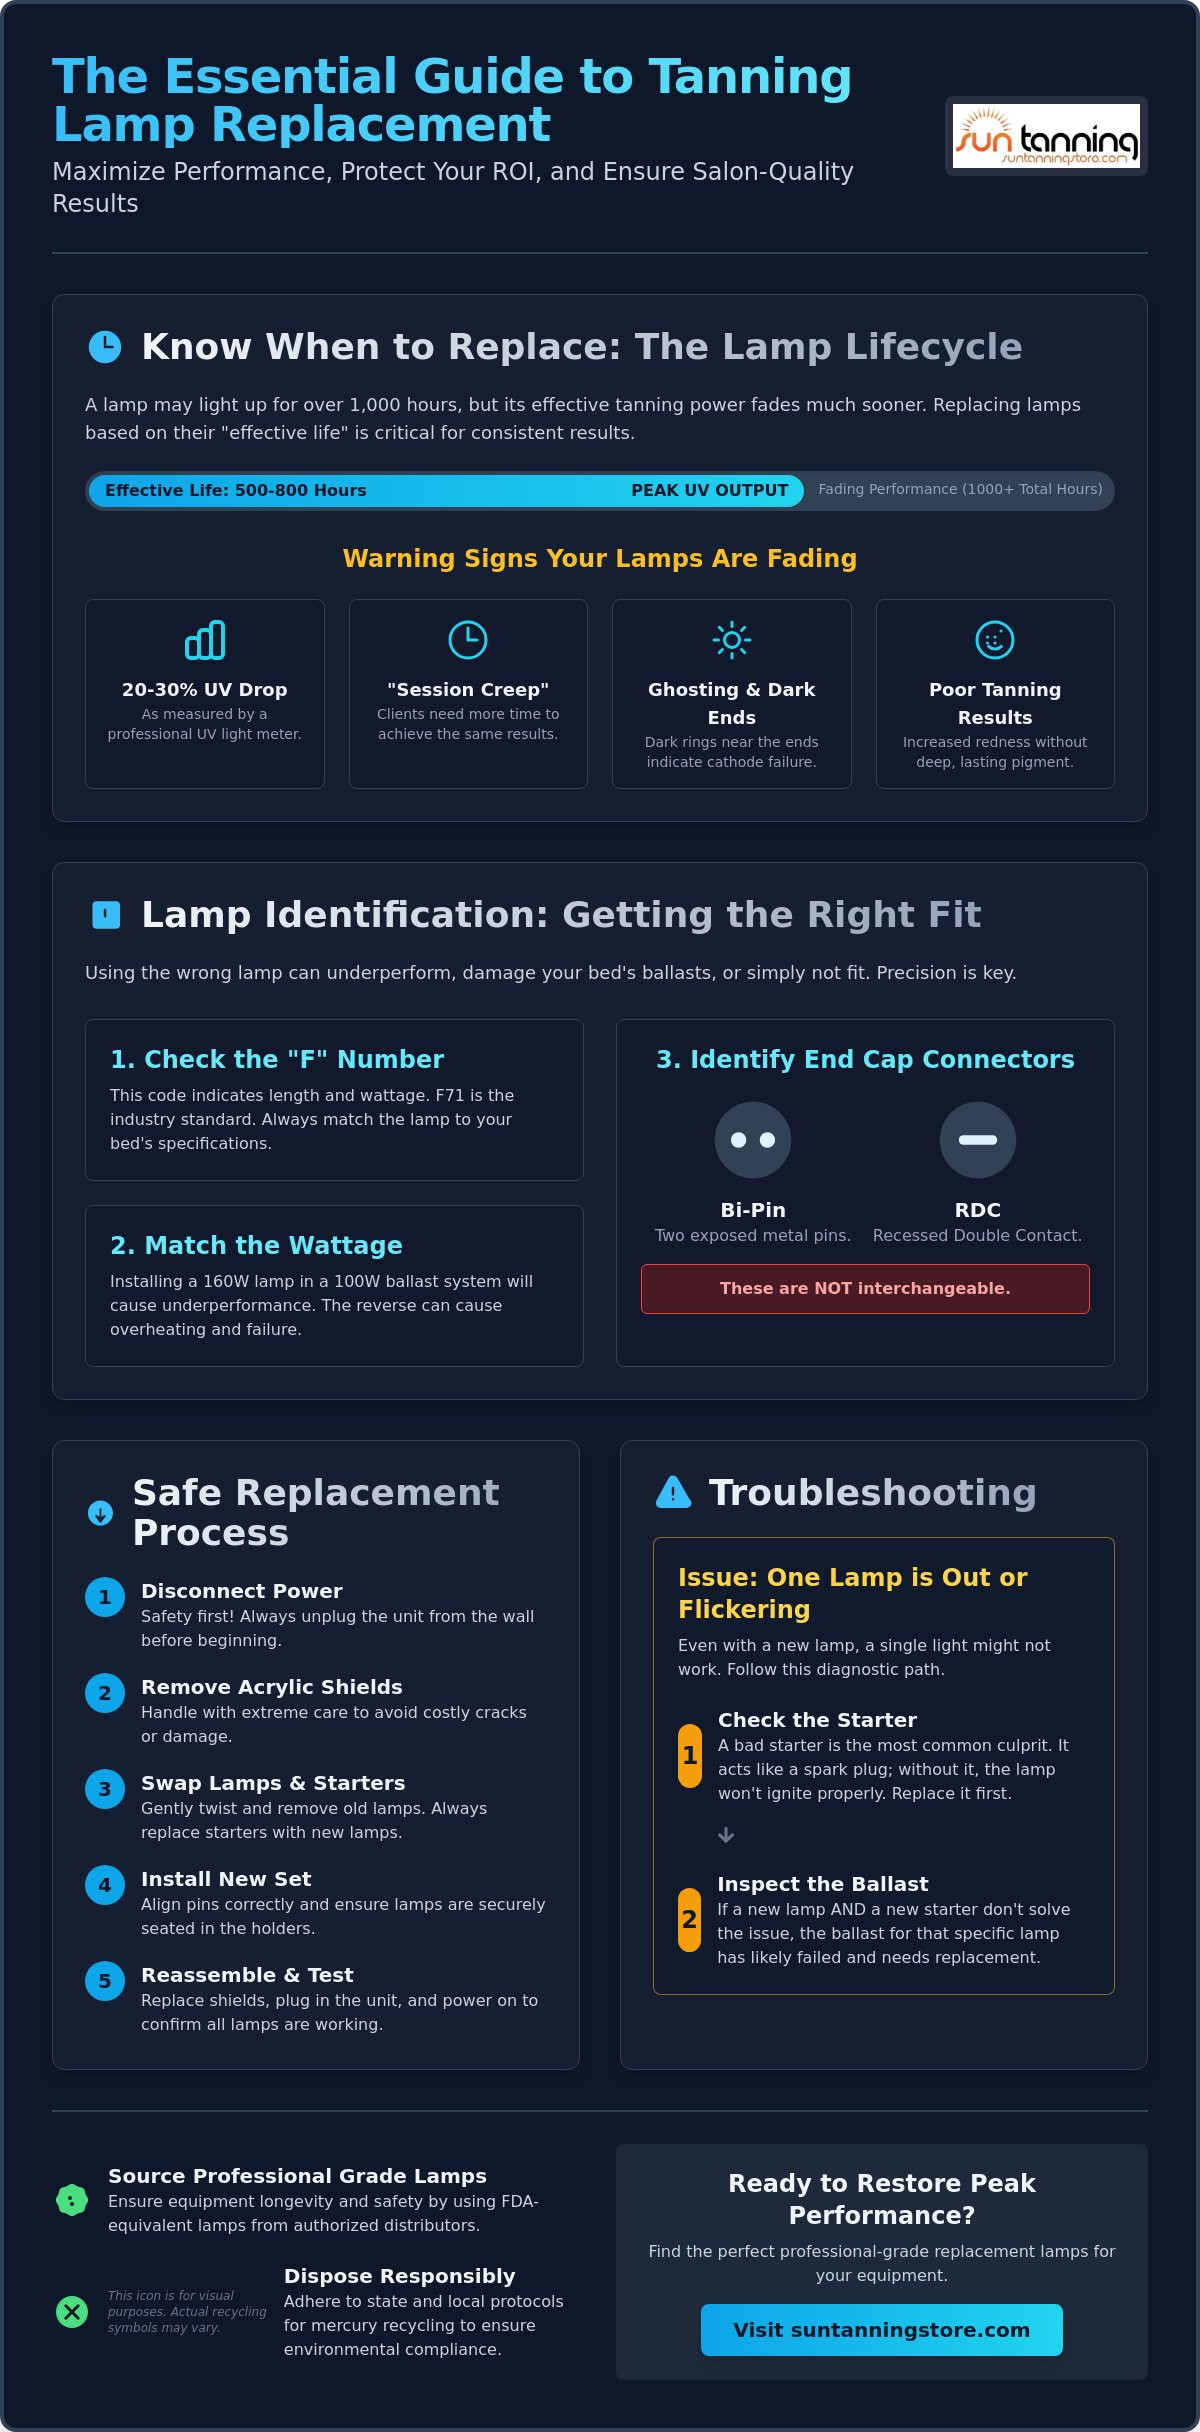
Lamps don't die; they simply fade away. Understanding the "effective life" of your equipment is the first step in learning how to replace tanning bed lamps with professional precision. While a standard tube may continue to illuminate for over 1,000 hours, its ability to produce consistent bronzing results typically drops off significantly much earlier. This phenomenon occurs because the internal phosphor coating degrades under constant heat and UV stress. Most commercial operations follow the 500-800 hour rule. High-traffic salons often swap bulbs at the 500-hour mark to maintain premium Level 4 performance, while residential users might stretch usage to 800 hours before noticing a decline.
Relying on guesswork is a risk to your equipment ROI. Professional operators use a UV light meter to quantify output degradation scientifically. If your meter shows a 20% to 30% drop from the initial reading of a fresh set, your lamps are exhausted. You'll also notice "session creep," where users report needing 15 minutes to achieve the results they previously got in 10. These visual cues and performance metrics are the most reliable indicators that your hardware is no longer performing to factory specifications.
The Impact of Lamp Age on Tanning Results
As a lamp reaches the end of its lifecycle, the UVB/UVA ratio shifts unfavorably. This imbalance often leads to increased skin redness without the deep, lasting pigment associated with healthy UV exposure. Tanning lamp technology relies on a specific gas and phosphor mix that loses its calibration over time. Look for "ghosting" or dark dimming at the ends of the tube. These dark rings indicate the cathode is failing, signaling an immediate need for a full set replacement to avoid patchy results.
Tracking Your Tanning Bed Lamp Life
Precision tracking is standard on high-end equipment. ProSun tanning beds, including the Onyx and Jade series, feature integrated hour meters that provide a digital record of total usage. For multi-bed environments, maintaining a manual log is essential to avoid "mixed sets" where some lamps are stronger than others. Proactive maintenance is a financial strategy. Fresh lamps ensure customer retention by delivering the fast, visible results that justify their session price. Learning how to replace tanning bed lamps before they reach total exhaustion keeps your equipment running at peak efficiency.
Identifying Your Lamp Specifications: F71, F72, and High-Pressure Variants
Precision is the foundation of equipment maintenance. Before you learn how to replace tanning bed lamps, you must identify the exact technical specifications required by your ballast system. The "F" number printed on your lamp isn't just a model code; it indicates the nominal length and wattage profile. F71 lamps are the industry standard for most modern residential and commercial units, measuring approximately 71 inches from tip to tip. Using the wrong length or wattage rating can lead to catastrophic ballast failure or poor UV output.
Visual identification of the end caps is equally critical. Most lamps use a Bi-Pin configuration, characterized by two exposed metal pins on each end that slide into the lamp holder. Conversely, RDC (Recessed Double Contact) lamps feature a single, spring-loaded cap on each end. These are not interchangeable. You must also match the lamp wattage to your bed's internal ballasts. A 160W lamp installed in a 100W ballast will underperform, while the reverse can lead to dangerous overheating. If you're unsure about your specific requirements, you can find a comprehensive selection of replacement tanning lamps designed to meet OEM standards.
Compliance with state safety regulations often requires that any replacement lamp must be an FDA-equivalent match to the original equipment. This ensures the UVB/UVA ratios remain within safe operating parameters. Don't overlook the starters during this process. Starters act like spark plugs for your lamps; an old, degraded starter can cause a brand-new lamp to flicker or fail prematurely. We recommend replacing every starter whenever you install a fresh set of lamps to ensure a clean strike and consistent performance.
F71 vs. F72 and F73: Finding the Right Fit
While F71 is dominant, older specialty beds like SunDash or Montego Bay often require F72 or F73 lamps. These variants differ slightly in length and end cap style. To verify your needs, use the "tip to tip" measurement technique. Measure from the very end of the metal pins on one side to the pins on the other. This ensures you aren't stuck with a bulk shipment of lamps that physically won't fit your canopy.
High-Pressure Facial Lamps and Hybrid Options
Modern equipment like the ProSun Jade or Onyx series often utilizes hybrid technology, combining UV tanning with red light therapy in a single tube. When replacing these, ensure the phosphor blend matches your original specs. For high-pressure quartz facial lamps, never touch the blue glass with bare hands. Skin oils create "hot spots" on the quartz that lead to immediate glass failure upon heating. Always use a clean cloth or gloves for these specialized components.
Step-by-Step Guide: How to Replace Tanning Bed Lamps Safely
Safety is the primary priority when performing any equipment maintenance. Before you begin learning how to replace tanning bed lamps, you must disconnect the power source entirely. Simply turning off the timer is insufficient; unplug the unit from the wall or shut off the dedicated breaker to eliminate any risk of electrical shock. Gather your supplies before opening the canopy. You'll need a non-abrasive cleaning solution, several microfibre cloths, and a pair of clean cotton gloves to ensure the new glass remains free of contaminants.
While the lamps are the focus, the reflectors behind them are equally important. Dust and film buildup on these metal surfaces can reduce your UV bounce by up to 10%. Once the old lamps are removed, take a moment to wipe down the reflectors. This ensures your new investment performs at its maximum potential. Maintaining predictable UV output isn't just about aesthetics; it's a safety concern. Because of the documented dangers of indoor tanning when equipment is poorly calibrated, precise lamp installation is essential for maintaining the exposure schedules your clients rely on.
Removing the Acrylic Shield Without Cracking
Acrylic removal is the most delicate stage of the process. Most ProSun models utilize trim strips or specialized clips to hold the shield in place. Locate these fasteners along the edges of the canopy and bench. We strongly advise the "Two-Person Rule" for this step. Handling large, 71-inch acrylic sheets alone is a significant risk; these components are often brittle and expensive to replace if they flex too much and crack. Once removed, store the acrylic on a flat, soft surface, such as a rug or a stack of towels, to prevent scratching while you work on the lamps.
Installing the New Replacement Tanning Lamps
Removing and seating bi-pin lamps requires the "Quarter-Turn" technique. Gently rotate the old lamp 90 degrees until the pins align with the vertical slot in the lamp holder, then lift it out. When installing your fresh replacement tanning lamps, slide the pins into the slot and rotate the tube until you feel a distinct "click" or lock. This ensures a solid electrical connection. Always wear gloves during this stage. Skin oils left on the glass can create "hot spots" that cause the lamp to fail prematurely or even shatter under the high operating temperatures of a commercial bed.
Safety Protocols and Troubleshooting Common Installation Issues
Troubleshooting is a critical component of learning how to replace tanning bed lamps. Even when using premium components, technical hurdles can arise during the initial power-up. The "One Lamp Out" mystery is a frequent issue that often points to a failed starter rather than a defective bulb. If a single lamp stays dark, it's usually because the starter (the small cylindrical component near the lamp end) has reached the end of its life cycle and can no longer provide the necessary strike voltage.
Proper disposal is a legal necessity. Tanning lamps contain mercury, and you must adhere to state-specific recycling mandates to avoid environmental fines. States such as California, Minnesota, and Washington have particularly strict protocols regarding hazardous waste. If a lamp shatters during installation, do not use a vacuum cleaner, as this disperses mercury vapor into the air. Instead, use a damp paper towel to collect the glass shards and seal them in a puncture-proof container for specialized disposal.
Never operate the unit for testing purposes with the acrylic shields removed. These barriers are essential for filtering specific UV wavelengths; exposing yourself to raw output can cause immediate skin and eye damage. For those managing multiple beds, maintaining a stock of professional-grade replacement tanning lamps ensures you can resolve these technical issues without significant downtime.
What to Do If a New Lamp Won’t Fire
Start with the swapping method. Move the non-responsive lamp to a known working socket. If the lamp illuminates in the new position, your issue is likely a failed starter or a faulty ballast in the original terminal. Inspect the lamp holders (frequently called "tombstones") for loose wiring or signs of thermal melting. If the lamp fails to fire in multiple sockets, the bulb itself may have been damaged during transit.
Protecting Your Equipment and Yourself
After reassembly, apply a specialized tanning bed sanitizer to the acrylic. Standard household cleaners often contain ammonia or alcohol, which can cloud or crack the acrylic over time. Verify that all cooling fans are free of dust and debris to prevent heat-related lamp failure and ballast overheating. Commercial tanning units typically operate on 220v electrical systems, creating a lethal hazard for technicians who fail to disconnect the power source before servicing.
Sourcing Professional-Grade Replacement Tanning Lamps
Precision matters in procurement. Sourcing from authorized distributors ensures that your lamps meet the exact spectral requirements of your unit, a level of consistency that generic marketplace sellers rarely provide. When considering how to replace tanning bed lamps, the quality of the glass and the stability of the gas mixture are just as important as the price tag. Marketplace bulbs often lack the rigorous testing required to guarantee FDA-equivalent output, which can lead to unpredictable tanning results or even ballast damage. For commercial operators, analyzing tanning salon equipment packages can reveal significant cost advantages on bulk lamp orders, often including shipping insurance to protect against transit breakage. Expert support from specialized distributors like Sun Tanning Store provides the technical knowledge necessary for specific model matching, ensuring your new lamps are perfectly calibrated for your ProSun or generic equipment.
Why Quality Lamps Matter for Your ROI
Generic "eBay bulbs" often utilize inferior phosphors that degrade rapidly, leading to inconsistent results and customer complaints. Investing in professional-grade ProSun compatible lamps ensures that your equipment operates within its designed safety margins while delivering the high-intensity results your clients expect. High-quality phosphors maintain their UVB output for a longer duration of the lamp's life, which directly impacts your bottom line. New, efficient lamps reduce the need for extended session times. This efficiency saves on electricity costs and reduces the thermal load on your internal components, extending the overall lifespan of your bed.
Next Steps for Your Tanning Setup
Modernizing your service menu often starts with a lamp upgrade. As you evaluate your maintenance schedule, you might consider expanding your offerings with a red light therapy canopy to provide hybrid skin rejuvenation benefits alongside traditional UV sessions. Don't wait for a total failure to act. Secure your next set of Replacement Tanning Lamps today to avoid the performance dip that occurs as you approach the 800-hour threshold. Use this final checklist to ensure a seamless maintenance cycle:
- Order a complete set of fresh starters to match your new lamps.
- Stock up on specialized acrylic cleaner to maintain shield clarity.
- Verify your ballast wattage against your lamp specifications one last time.
- Confirm your shipping insurance is active to protect your glass investment during transit.
Mastering how to replace tanning bed lamps is a foundational skill for any salon owner or home enthusiast. By prioritizing professional-grade components and following a structured installation protocol, you ensure your equipment remains a reliable asset for years to come.
Restore Your Salon-Quality UV Performance Today
Maintaining professional UV output requires a balance of technical precision and proactive scheduling. You've now mastered the essential steps of identifying lamp specifications, handling delicate acrylic shields, and troubleshooting installation hurdles like failing starters. These maintenance protocols ensure your equipment delivers the fast, consistent results your clients expect while protecting your long-term ROI. Understanding how to replace tanning bed lamps is the most effective way to keep your unit running at its peak factory-rated capacity.
As an Authorized National Distributor, we maintain a high-volume commercial inventory to ensure you never face unnecessary downtime. Our team provides expert technical support for ProSun equipment and other major brands, helping you match specifications with absolute certainty. Don't let faded lamps compromise your results or your salon's reputation. Shop Professional Replacement Tanning Lamps Now and secure the reliability your business deserves. You have the technical knowledge; now get the professional-grade components that make it count.
Frequently Asked Questions
How often to replace tanning bed lamps for the best results?
Tanning lamps should be replaced every 500 to 800 hours of use to maintain peak UV output. While the bulbs will continue to illuminate for much longer, their ability to produce a tan drops significantly after this window. Commercial salons typically replace lamps at the 500-hour mark to ensure customer satisfaction. Residential users can often wait until 800 hours before the decline in bronzing performance becomes too noticeable for their needs.
Can I use a different brand of lamp than what came in my tanning bed?
You can use a different brand of lamp as long as the technical specifications match the original manufacturer’s requirements. The replacement must have the same wattage, length, and UVA/UVB ratio to ensure safety and performance. Always verify that the new lamps are compatible with your bed’s ballasts. Using mismatched lamps can lead to electrical failure or inconsistent tanning results across the bench and canopy sections of your equipment.
What is the difference between F71 and F72 tanning lamps?
The primary difference between F71 and F72 lamps is their physical length and end cap configuration. F71 lamps are approximately 71 inches long and utilize a bi-pin base with two exposed metal pins. F72 lamps are slightly longer and typically feature Recessed Double Contact (RDC) end caps. These two types are not interchangeable. You must measure your current bulbs tip-to-tip to ensure you order the correct size for your specific bed model.
Do I need to replace the starters every time I change the bulbs?
Replacing your starters every time you install a new set of lamps is a recommended industry best practice. Starters act like spark plugs for your UV system; they wear out over time and lose their ability to provide a clean electrical strike. Using old starters with new bulbs can cause flickering, delayed ignition, and premature lamp failure. This small investment protects the lifespan and performance of your more expensive replacement lamps.
How do I dispose of old tanning bed lamps legally?
Legally disposing of old tanning lamps requires using a certified mercury recycling center. Because these lamps contain small amounts of mercury vapor, they are classified as hazardous waste in many states. You should never place them in standard residential or commercial trash bins. Contact your local waste management authority or a specialized electronics recycler to find a designated drop-off point that complies with environmental safety regulations and state-specific mandates.
Why are the ends of my new tanning lamps flickering?
Flickering at the ends of a new lamp usually signals a failing starter or a poor connection in the lamp holder. If you didn't replace the starters during your lamp swap, an old starter is the most likely culprit. Check that the lamp is seated correctly with a firm quarter-turn lock. If the issue persists after swapping the starter with a known working one, you may have a loose wire in the tombstone.
Is it safe to replace my own tanning bed lamps or do I need a pro?
It is entirely safe to replace your own lamps if you follow proper electrical safety protocols. You must disconnect the bed from the power source before starting any maintenance. Learning how to replace tanning bed lamps allows you to save on labor costs while ensuring the job is done with precision. Having a second person assist with the large acrylic shields is the best way to prevent accidental equipment damage.
Can I put red light therapy lamps in a traditional UV tanning bed?
You can install red light therapy lamps in a traditional bed if they match the wattage and pin specifications of your ballasts. This is a common way to convert a standard UV unit into a hybrid or red light therapy system. Ensure the new lamps are designed for the specific electrical load of your equipment. This modification allows you to offer skin rejuvenation benefits without the need to purchase an entirely new unit.