


How to Clean Tanning Bed Acrylics: The Professional Maintenance & Replacement Guide
Using the wrong chemical on your tanning bed can turn a premium investment into a spiderweb of cracks in seconds. It's a costly error that compromises both safety and tan quality. You likely already prioritize a sanitized environment to build client trust. However, mastering how to clean tanning bed acrylics without causing "crazing" or reducing UV penetration is what separates a high-performance studio from one with fading results. Cloudy or foggy sheets aren't just an eyesore. They're a physical barrier that blocks the very light your customers are paying for.
This professional guide provides the exact steps to sanitize and maintain your acrylics to maximize UV output. We'll show you how to avoid chemical pitfalls that lead to permanent damage and help you determine exactly when it's time for a professional replacement. From navigating state-level compliance issues, such as the potential $1,000 daily fines in Illinois, to identifying the signs of physical stress, you'll gain the technical clarity needed to keep your equipment running at peak efficiency. Learn to restore that crystal-clear finish and ensure your beds deliver the professional results your brand promises.
Key Takeaways
- Understand the specialized porosity of UV-transparent polymers and how heat impacts their ability to trap oils and contaminants.
- Master the exact protocol for how to clean tanning bed acrylics using precise dilution ratios to ensure hospital-grade sanitation.
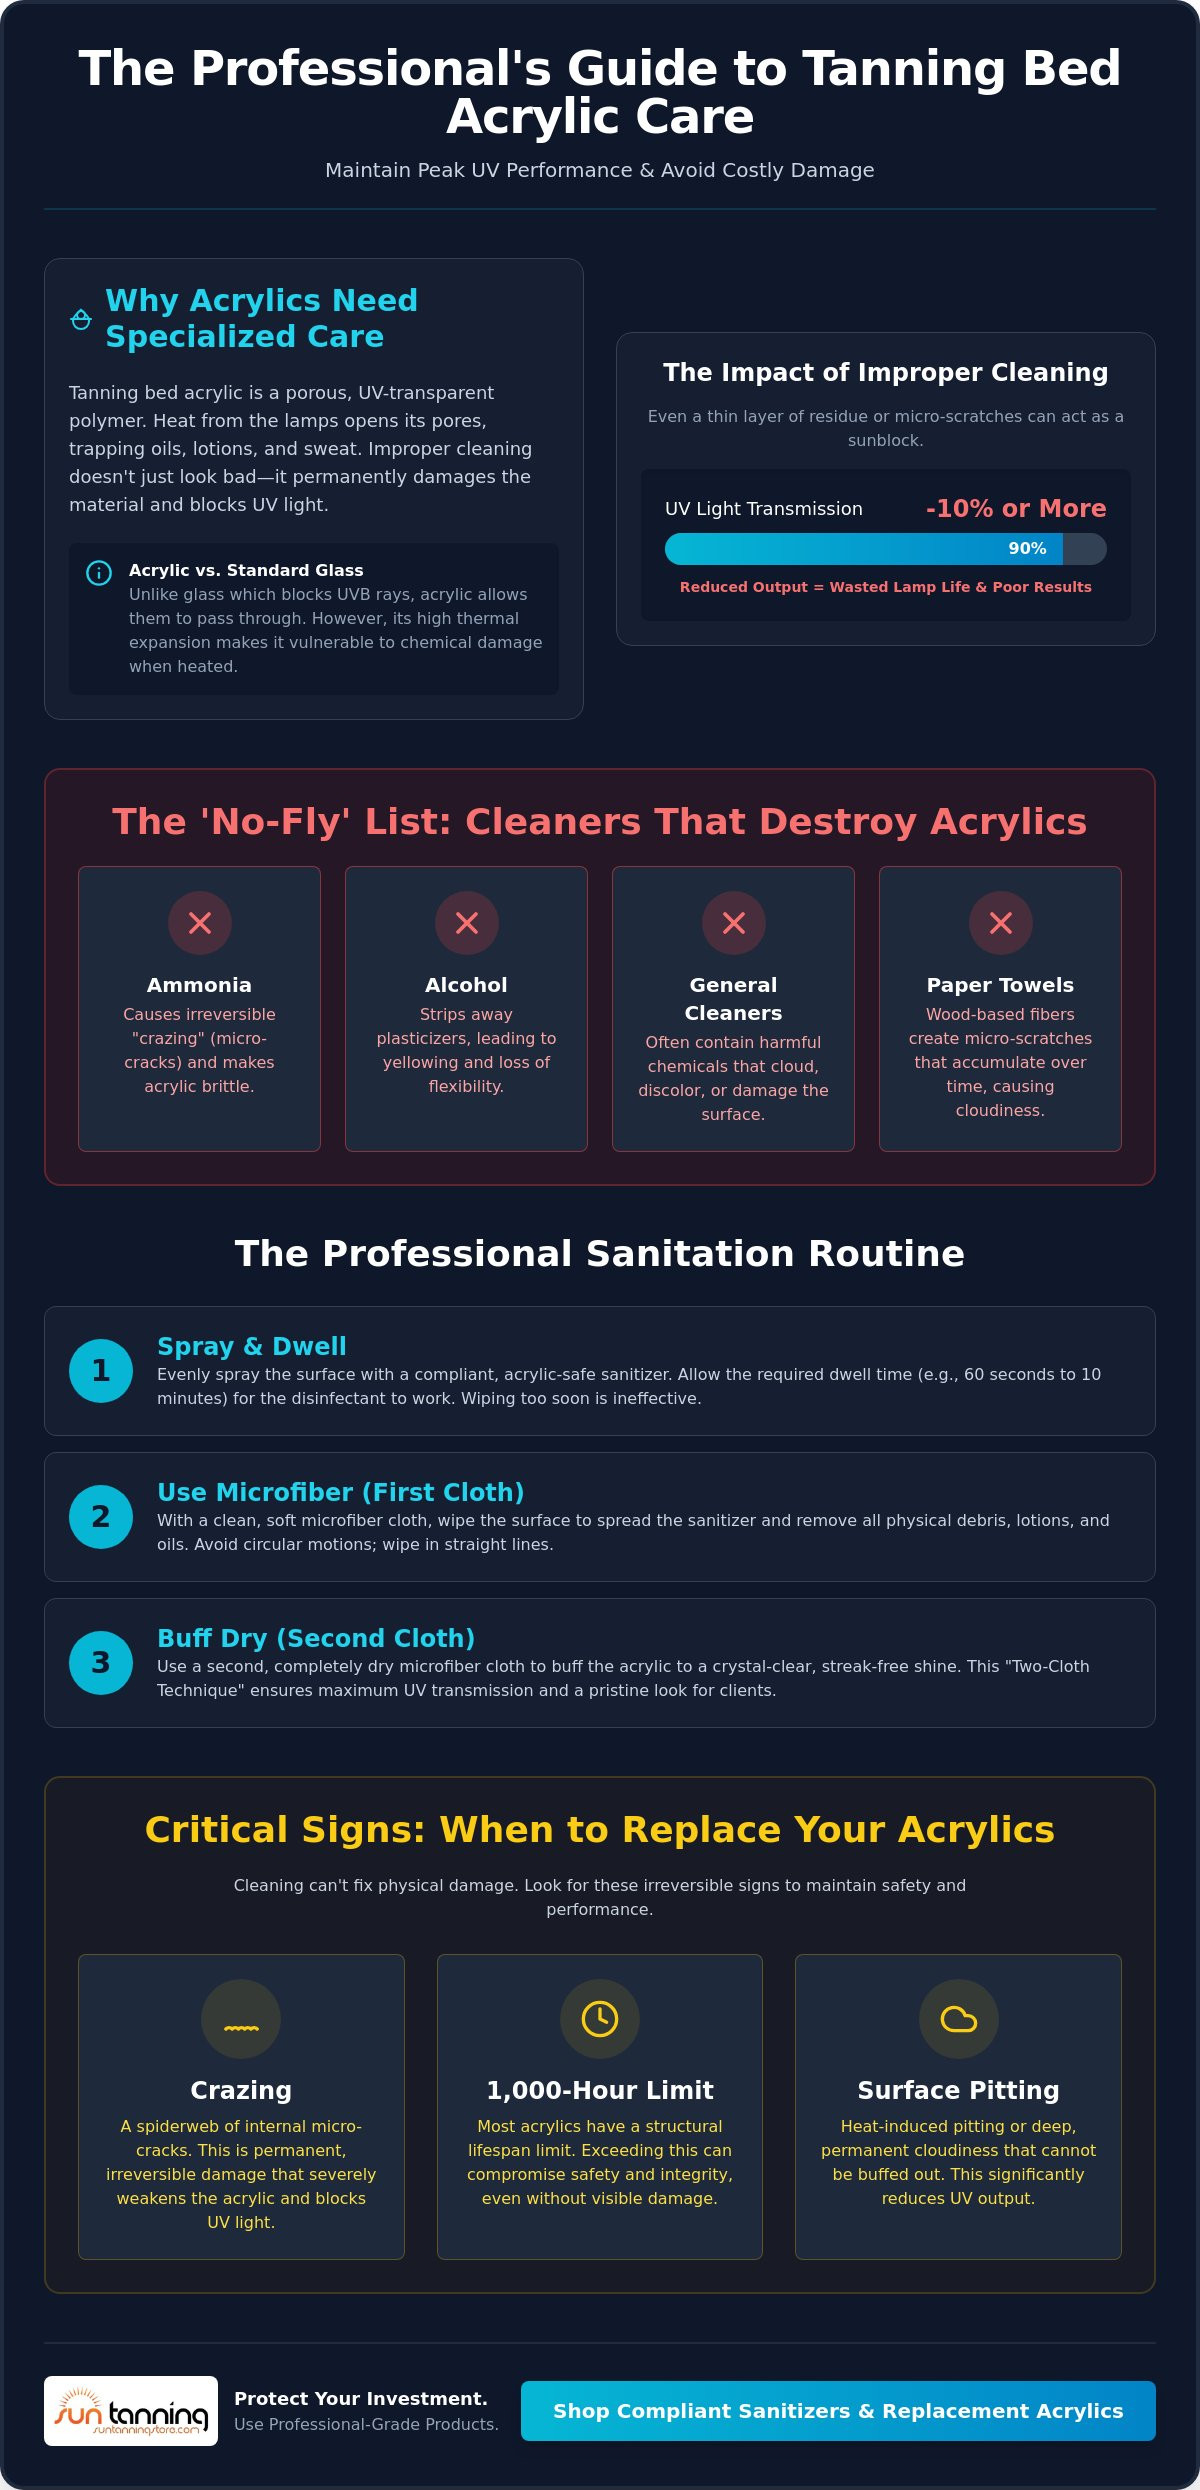
- Identify the "No-Fly" list of household chemicals, such as ammonia and alcohol, that cause permanent yellowing and brittle "crazing."
- Recognize the critical thresholds for replacement, including the 1,000-hour structural limit and heat-induced surface pitting.
- Learn to distinguish between OEM and aftermarket options to select the correct clear or frosted acrylic for your specific equipment model.
Understanding Tanning Bed Acrylics: Why Specialized Care is Mandatory
High-performance tanning results depend on more than just lamp wattage. Tanning bed acrylic is a specialized UV-transparent polymer designed to withstand intense heat while allowing maximum ultraviolet light to pass through. Unlike standard household plastics, these sheets are engineered for a specific transmission rate. When you're learning how to clean tanning bed acrylics, you must understand that this material is porous. As the lamps in a ProSun Onyx or Jade 32 reach operating temperatures, the acrylic expands and its microscopic pores open. This state makes the surface highly susceptible to trapping body oils, sweat, and tanning lotion residues.
There's a distinct difference between cleaning and sanitizing. Cleaning involves the physical removal of surface debris and lotion buildup that can cloud the sheet. Sanitizing is the chemical process of killing pathogens to ensure a safe environment for the next user. If you only clean without sanitizing, you risk cross-contamination. Conversely, using a sanitizer without properly cleaning first allows "bio-film" to protect bacteria from the disinfectant. Maintaining this balance is essential for both equipment longevity and client safety.
Acrylic vs. Glass: The Technical Difference
Standard window glass is a natural UV filter. It blocks the specific UVB rays required for the tanning process, which is why Understanding Tanning Bed Technology is critical for equipment owners. Acrylic provides the necessary transparency while acting as a shield for the lamps. However, acrylic has a higher rate of thermal expansion than glass. This means the material moves and flexes during a session. Using the wrong cleaners during this heated state can lead to immediate surface damage that compromises the integrity of the bed.
The Science of UV Transmission
Every micro-scratch or layer of chemical residue acts as a "sunblock" for the tanner. Even a thin layer of "orange peel" texture or cloudiness can reduce UV output by 10% or more, effectively wasting the life of your replacement tanning lamps. This degradation is often accelerated by "crazing," which are internal micro-cracks. Crazing occurs when harsh chemicals like ammonia strip the plasticizers from the polymer, making it brittle. Once crazing begins, it's irreversible. It signifies that you must stop cleaning and begin the replacement process to maintain professional standards and maximum UV penetration.
Step-by-Step Guide: How to Clean Tanning Bed Acrylics Like a Pro
Before you apply any solution, perform a visual sweep of the surface. Look for deep pitting or hairline fractures. If the surface is physically compromised, liquid can seep into the bed's internals and pose a serious electrical risk. Understanding how to clean tanning bed acrylics starts with this essential safety check. Next, verify your solution's dilution ratio. High concentrations of disinfectant don't provide "extra" cleaning power. Instead, they leave a sticky film that attracts dust and can eventually lead to the chemical-induced crazing discussed previously. Precision in mixing is the only way to protect your investment.
Professional maintenance requires patience. Most hospital-grade sanitizers require a specific dwell time, often ranging from 60 seconds to 10 minutes, to effectively neutralize pathogens. Wiping the solution off immediately after spraying renders the disinfectant useless. For high-volume operations, using the right tanning bed sanitizers ensures both speed and compliance without risking the structural integrity of the acrylic. Once the dwell time is complete, you can proceed to the final buffing stages to restore clarity.
The Daily Sanitation Routine
Step 1: Spray the surface evenly. Focus on the areas with the most body contact, but avoid saturating the edges where liquid could run down into the lamp electronics. Step 2: Use a clean, soft microfiber cloth. Avoid paper towels. Although they seem convenient, paper towels are wood-based and can create micro-scratches over time. These scratches eventually lead to the UV-blocking cloudiness that reduces tan quality. Step 3: Implement the "Two-Cloth" technique. Use the first cloth to spread the sanitizer and remove debris. Use a second, dry microfiber cloth to buff the surface to a streak-free shine. This ensures maximum light penetration and a professional look for your clients.
Deep Cleaning the Underside
Cleaning the top surface is only half the job. Every 50 to 100 hours of lamp use, you should remove the acrylic to clean the underside and the reflectors. Dust-burn, a thin layer of carbonized particles, often builds up on the bottom of the sheet due to the intense heat from the lamps. This buildup acts as a filter that diminishes the bed's effectiveness.
Handle the acrylic with care. These sheets are flexible but can snap if twisted or dropped on a corner. Use a suction cup tool or a second person to lift the sheet safely. Wipe the lamps and reflectors with a dry cloth or specialized lamp cleaner to ensure your ProSun Onyx or Jade 32 continues to operate at peak performance levels.
The 'No-Fly' List: Common Cleaners That Destroy Tanning Bed Acrylic
Using the wrong chemical can ruin an expensive acrylic sheet in a single application. While you now know the daily routine for how to clean tanning bed acrylics, identifying what to avoid is equally critical for preserving your equipment. The most common offender is ammonia, found in standard blue window cleaners. Ammonia is highly alkaline and aggressively attacks the surface of UV polymers, leading to immediate yellowing and a loss of structural integrity. This damage is often instantaneous and irreversible.
Alcohol and industrial solvents are similarly destructive. These chemicals strip away the plasticizers that keep the acrylic flexible under the intense heat of high-output lamps. Without these plasticizers, the sheet becomes brittle and prone to shattering under the weight of a user. Even natural acids like vinegar, often touted as a safe household alternative, are too harsh. Vinegar can etch the finish over time, creating a dull surface that scatters UV light rather than letting it penetrate. This scattering reduces the efficacy of your tanning sessions.
Never use abrasive powders or scouring pads. Even if you encounter stubborn lotion buildup, scrubbing creates permanent micro-scratches. These scratches are not just cosmetic. They trap bacteria and block UV rays, effectively degrading the performance of your equipment. For those managing professional studios, sticking to approved tanning bed sanitizers is the only way to ensure compliance and longevity.
Identifying Chemical Damage (Crazing)
Chemical damage typically manifests as "crazing." This is a network of fine, spiderweb-like cracks that appear deep inside the material. Unlike surface dirt or dust-burn, crazing is internal and cannot be polished or buffed out. It represents a permanent structural failure. Most manufacturers consider the use of unapproved chemicals a form of neglect. This will void your equipment warranty immediately, leaving you responsible for the full cost of replacement.
Safe Alternatives and Approved Sanitizers
To protect your investment, look for products specifically labeled as "Acrylic Safe" and "pH Neutral." In a commercial environment, you must use EPA-approved sanitizers that meet hospital-grade standards. When researching how to clean tanning bed acrylics, prioritize products that list "Quaternary Ammonium" as the active ingredient. The ideal cleaner is a non-alcoholic, quaternary ammonium-based solution designed to kill pathogens without compromising the polymer structure.
Beyond Cleaning: When Tanning Bed Acrylic Replacement is Necessary
Knowing how to clean tanning bed acrylics only takes you so far. Eventually, the material reaches a point of diminishing returns. Most professionals follow the 1,000-hour rule. This is the threshold where the physical structure of the polymer begins to degrade. Heat from the lamps and the repetitive pressure of users cause the material to lose its elasticity. You might observe an 'orange peel' texture or deep pitting on the surface. These signs indicate that the heat has compromised the polymer's integrity. It's no longer just a cleaning issue; it's a performance bottleneck.
Use a UV-meter to prove the degradation. Measure the lamp output directly and then through the acrylic. If the delta is significant, the acrylic is effectively acting as a sunblock. This results in wasted lamp life and poor tan quality. Beyond performance, safety is a major factor. A cracked or brittle bench acrylic is a weight-bearing hazard. It can fail under the weight of a client, leading to liability issues. Replacing these sheets is a pragmatic business decision that protects both your customers and your reputation.
The Cost-Benefit of Replacement
A tanning bed acrylic replacement is often more cost-effective than frequent lamp changes. New lamps are useless if the light can't penetrate the barrier of a cloudy sheet. Refreshing the hardware restores the premium 'Level 4' experience and eliminates customer complaints about weak results. It's an efficient way to maintain a professional tanning environment without over-spending on unnecessary lamp swaps.
Measuring for Your New Acrylic
When you've exhausted your knowledge of how to clean tanning bed acrylics and the surface remains cloudy, it's time to measure for a replacement. Start by locating the make and model of your unit, such as a ProSun Onyx or Jade 32. Measure the length and width to the nearest fraction of an inch. For curved canopy models, you must measure the 'arc' to ensure the replacement fits the frame perfectly. This precision ensures compatibility with tanning bed accessories like masks and pillows. Proper fitment is the final step in restoring your bed's output.
Restore your bed's maximum UV penetration by selecting the correct tanning bed acrylics for your specific model.
Selecting and Installing Replacement Tanning Bed Acrylics
Choosing the right replacement involves balancing OEM precision with aftermarket value. Original Equipment Manufacturer (OEM) sheets guarantee a perfect factory fit for units like the ProSun Onyx. High-quality aftermarket options are often more accessible and, when sourced correctly, offer identical UV-stabilization properties. Avoid "generic" acrylics from local hardware stores. These lack the UV-transparency required for tanning and will yellow almost immediately under high-intensity lamps. You must also decide between clear and frosted finishes. Clear acrylic is the industry standard for maximum UV penetration, while frosted options are typically reserved for specific aesthetic needs or red light therapy units where light diffusion is a priority.
Shipping large acrylic sheets requires specialized logistical care. Because these sheets are fragile and prone to bowing, professional crating is essential for any order. Standard cardboard packaging often fails during transit, leading to hairline fractures that might not be visible until the bed heats up. When the new sheet arrives, handle it by the edges to avoid transferring skin oils before the first professional cleaning. Knowing how to clean tanning bed acrylics is a vital skill, but even the best maintenance routine can't fix a sheet that has been compromised during a poor installation.
Sun Tanning Store's Quality Standards
We only stock high-grade, UV-stabilized acrylic designed to meet the rigorous demands of commercial and residential use. Buying from an authorized tanning equipment distributor ensures you receive a product that matches the technical specifications of your unit. This is particularly important when maintaining a consistent look across your tanning salon equipment packages. A mismatch in acrylic clarity or thickness can lead to uneven results across different beds, which impacts customer satisfaction.
Final Maintenance Tips for Your New Acrylic
Your first task after installation is removing the protective film and neutralizing the static charge. New acrylic acts as a magnet for dust and lint. Use an approved anti-static cleaner to prep the surface before the first session. To ensure the longest possible lifespan for your new hardware, implement a strict maintenance log. Track the following data points:
- Date of installation and lamp hour count.
- Daily cleaning intervals using quaternary ammonium-based solutions.
- Weekly deep-clean dates for the underside of the sheet.
- Monthly inspections for "pinch points" where the frame might be applying uneven pressure.
Installation is the best time to reset your maintenance standards. By following a professional protocol for how to clean tanning bed acrylics from day one, you can protect the polymer's transparency and maximize your ROI. Ready to restore your equipment's performance? Browse our full selection of tanning bed acrylics for sale to find the exact fit for your model.
Maximize Your UV Efficiency and Equipment Longevity
Maintaining a professional tanning environment requires a balance of daily sanitation and long-term hardware management. You now understand that while knowing how to clean tanning bed acrylics with pH-neutral, non-alcoholic solutions is essential for preventing crazing, even the most rigorous maintenance cannot stop the eventual structural degradation of the polymer. Once you reach the 1,000-hour threshold or observe significant UV blocking via meter testing, transitioning from cleaning to replacement is the only way to ensure your clients receive the results they expect. Professional-grade clarity isn't just about aesthetics; it's the foundation of your bed's performance.
As an Authorized National Distributor, we provide the technical expertise and inventory needed to refresh your equipment. We stock high-performance acrylics for ProSun, Jade, and Onyx models, ensuring a factory-grade fit every time. Every order includes specialized crating for safe delivery, protecting your investment from the moment it leaves our warehouse until it's installed in your bed. We take the guesswork out of logistics so you can focus on your customers and their tanning experience.
Shop Premium Replacement Tanning Bed Acrylics to restore your unit's maximum output today. Investing in high-quality hardware is the most reliable path to consistent, professional results that keep your clients coming back.
Frequently Asked Questions
Can I use Windex or glass cleaner on my tanning bed?
No, you should never use Windex or standard household glass cleaners. These products contain ammonia, which aggressively attacks the polymer structure of the sheet. This chemical reaction leads to immediate yellowing and irreversible "crazing," which are internal spiderweb-like cracks. Stick to quaternary ammonium-based sanitizers specifically designed for tanning equipment to preserve the life of your acrylic.
How often should I replace my tanning bed acrylic?
Most professionals follow the 1,000-hour rule for replacement. Over time, the intense heat from high-output lamps strips the plasticizers that keep the material flexible and transparent. If you notice a drop in UV transmission on your meter or see physical pitting, it is time for a new sheet. Regular monitoring of how to clean tanning bed acrylics can extend this lifespan, but physical degradation is inevitable in high-volume environments.
What is the best way to remove tanning lotion buildup from acrylic?
The most effective method is using a specialized acrylic polish or a pH-neutral cleaner. Avoid scrubbing with abrasive pads, as these create micro-scratches that trap even more residue. Apply a professional polish with a microfiber cloth to gently lift oils and silicone-based lotions. This restorative process helps maintain clear transmission for maximum UV penetration and a professional appearance.
Why is my tanning bed acrylic turning yellow or cloudy?
Yellowing is typically the result of chemical damage from unapproved cleaners like ammonia, alcohol, or vinegar. Cloudiness often stems from "dust-burn" on the underside of the sheet or a buildup of tanning lotions on the surface. In older equipment, this discoloration indicates that the UV-stabilized polymer has reached its operational limit and can no longer transmit light efficiently, making replacement necessary.
Is it safe to use a tanning bed if the acrylic has a small crack?
No, it is not safe to operate a bed with a cracked acrylic. Even a hairline fracture can fail catastrophically under the weight and thermal expansion of a session. Cracks also create sharp edges and provide a space for bacteria to grow where sanitizers cannot reach. Immediate replacement is mandatory to ensure user safety and maintain the structural integrity of your ProSun Onyx or Jade 32 bed.
How much does a replacement tanning bed acrylic sheet cost?
Replacement costs vary significantly based on the make, model, and thickness of the sheet. Larger commercial units or those with specialized curved canopy acrylics are typically a higher investment than standard residential bench sheets. Factors like professional crating and specialized shipping requirements also influence the total cost. Contact an authorized distributor to get a precise quote for your specific equipment model.
Can I use paper towels to clean my tanning bed?
Avoid using paper towels for daily maintenance. Paper towels are wood-based products that can create microscopic scratches on the soft polymer surface. Over hundreds of cleanings, these micro-scratches create a "haze" that blocks UV light and reduces tan quality. Always use a clean, non-abrasive microfiber cloth to ensure a streak-free finish without damaging the material. This is a core rule for how to clean tanning bed acrylics correctly.
Do I need to clean the lamps when I replace the acrylic?
Yes, cleaning your lamps is a critical step during acrylic replacement. Dust and carbonized particles accumulate on the lamp glass and reflectors, reducing the overall output of your unit. While the acrylic is removed, wipe each lamp with a dry, lint-free cloth to remove this "dust-burn." This ensures your new acrylic provides the maximum possible UV transmission from the first session.