


How to Change Tanning Bed Bulbs: The 2026 Maintenance Guide & Myth-Buster
Your tanning bulbs are likely "dead" even if they are still glowing bright enough to light up the room. It's a common frustration; you see the light and feel the heat, but the bronzing results have stalled. Most users hesitate to perform maintenance because they fear shattering expensive glass or ordering the wrong technical specifications. Understanding how to change tanning bed bulbs is about more than just physical labor. It's about maintaining the integrity of your equipment and ensuring every session produces a deep, consistent tan.
This 2026 maintenance guide provides the professional clarity you need to handle lamp swaps with confidence. You'll master the technique for securing different end types, from Bi-Pin to RDC, while avoiding common installation errors. We also reveal the truth about UV degradation; this ensures you stop wasting money on lamps that have lost their effectiveness despite their visible brightness. With the industry shifting toward hybrid technology and updated 2026 safety standards, staying informed is essential. This overview covers everything from physical installation to the data-driven schedules that guarantee maximum bronzing results.
Key Takeaways
- Understand the science of UV degradation and why visible light is an unreliable indicator of a lamp’s actual tanning effectiveness.
- Master the professional technique for how to change tanning bed bulbs safely, including proper acrylic removal and essential ballast cooling protocols.
- Learn to identify physical warning signs like cathode darkening to ensure you replace lamps at the optimal point in their 500 to 1,000-hour lifespan.
- Navigate technical requirements like wattage matching and compatibility sheets to maintain equipment performance and strict regulatory compliance.
- Implement the "100-hour rule" and specialized cleaning routines to maximize the longevity and UV output of your new replacement lamps.
The 'If It Lights Up, It's Working' Myth: Understanding UV Degradation
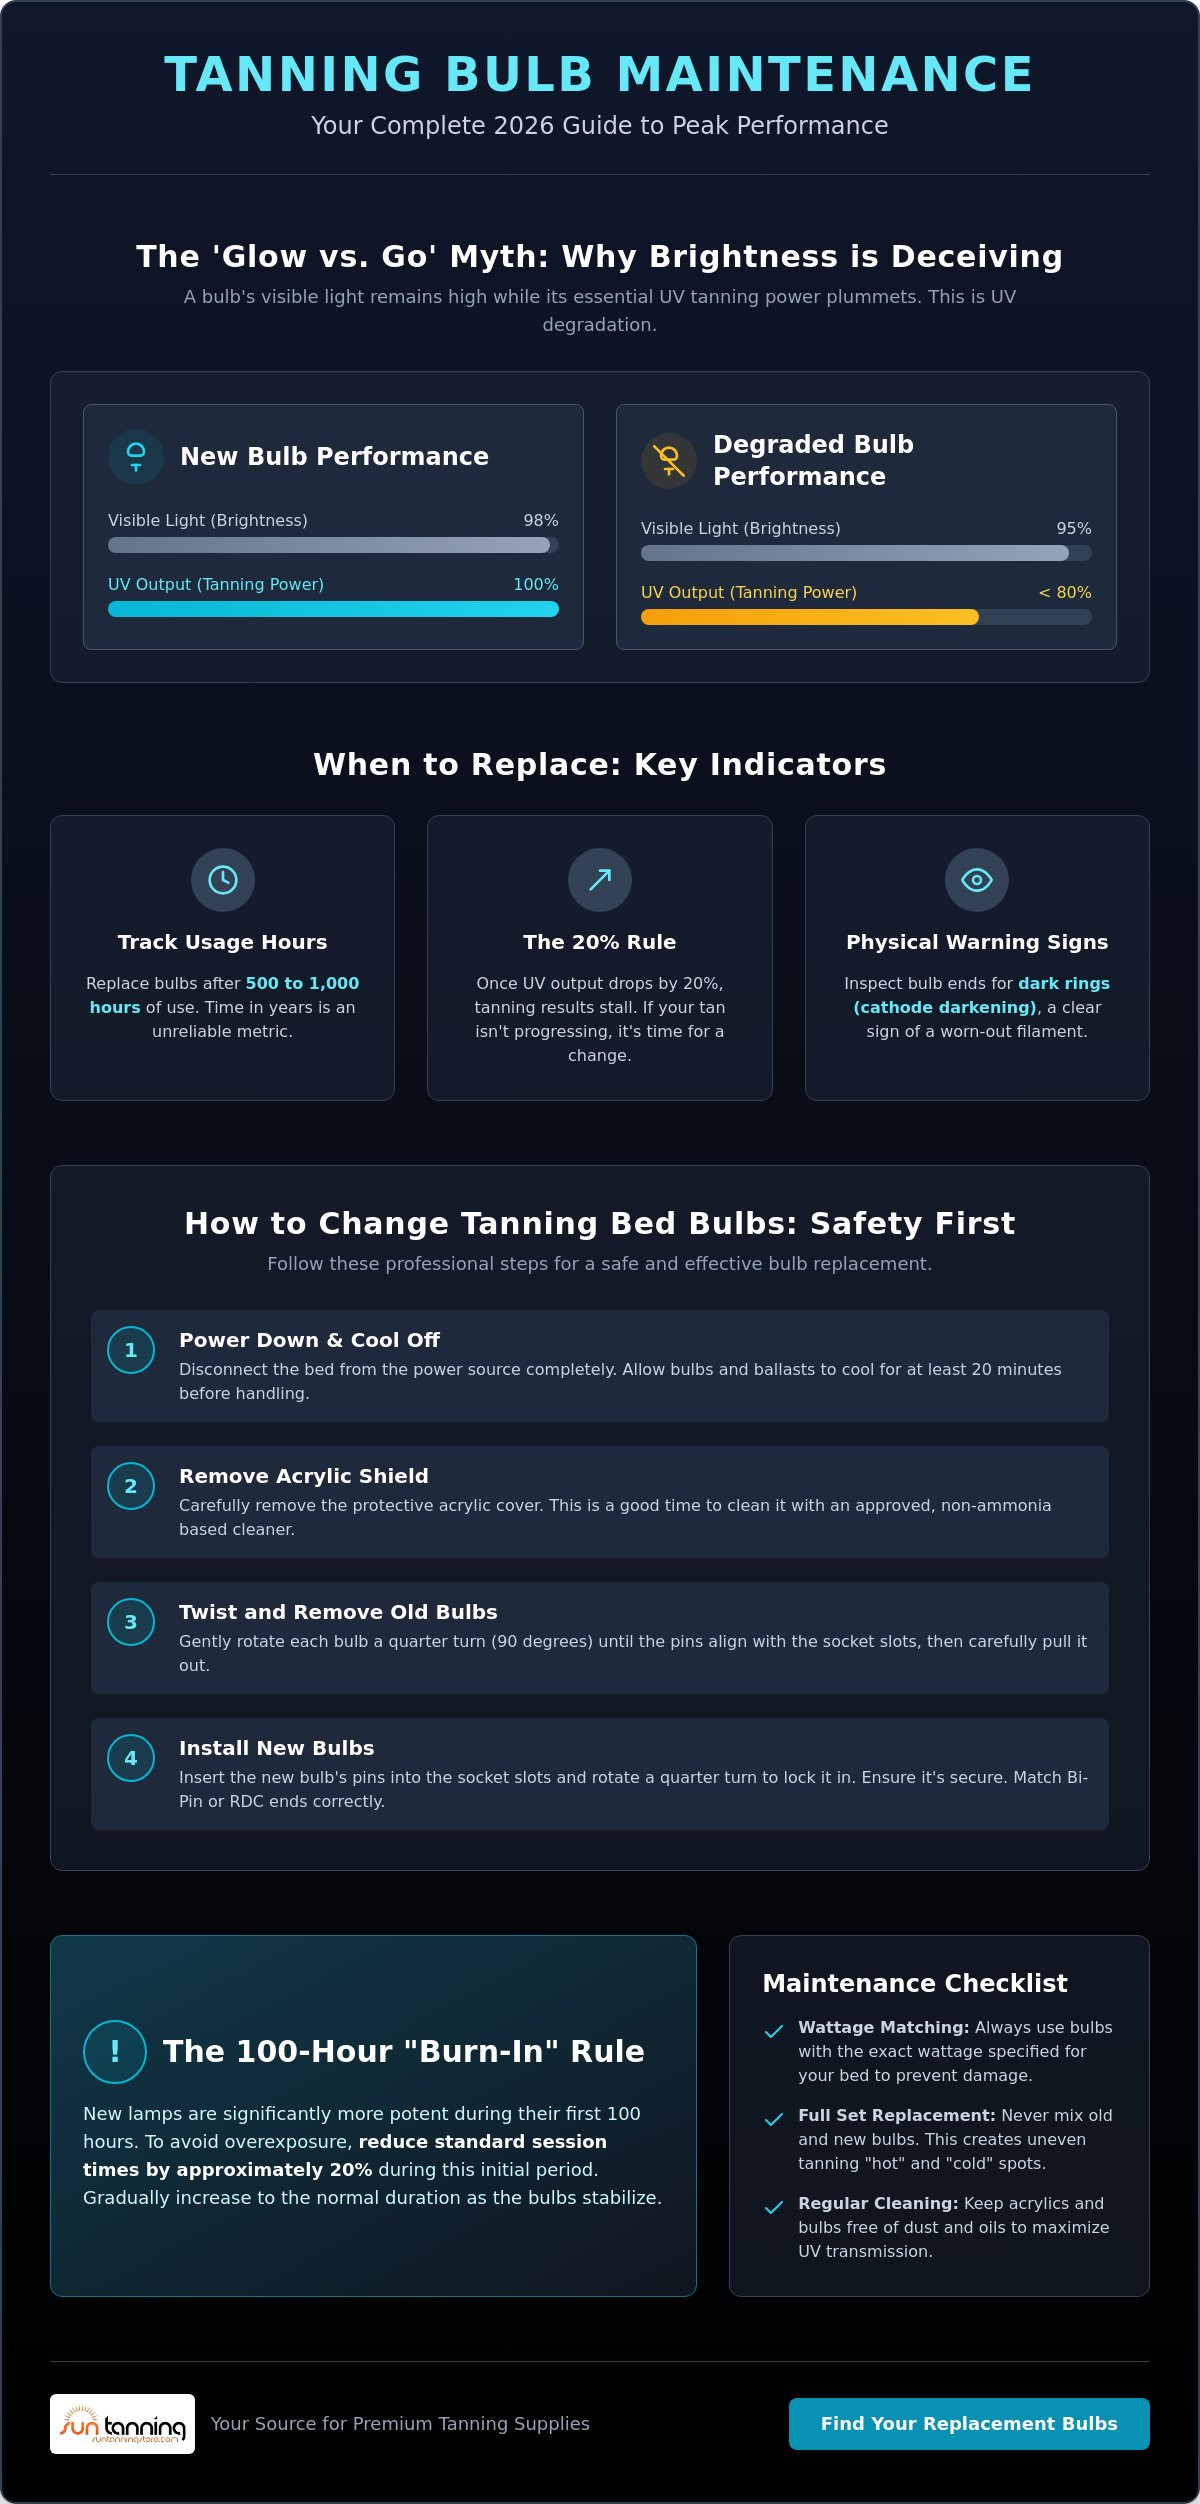
A common mistake among equipment owners is assuming that a glowing lamp is a functional lamp. While a standard household bulb is binary, meaning it either works or it doesn't, tanning lamps operate on a performance curve. These specialized units rely on internal phosphor coatings to convert mercury vapor energy into specific UV wavelengths. Over time, the electrical life of the bulb remains intact, so it still draws power and emits visible light (lumens), but the effective life has expired. This distinction is critical because your tan depends on irradiance, not just brightness. If you wait until a bulb physically burns out before learning how to change tanning bed bulbs, you have likely been wasting your time in a bed with negligible UV output for months.
Visible light is merely a byproduct of the mercury vapor reaction. Tanning results are driven by irradiance, which is the actual UV power reaching the skin. As the internal phosphors degrade, the ratio of lumens to UV shifts. The bulb stays bright, but the bronzing power vanishes. This is why professional maintenance schedules focus on hours of use rather than waiting for a total electrical failure. Understanding how tanning lamps work helps you recognize that a bulb's "death" is a slow decline in quality, not a sudden loss of light.
Why UV Output Drops Before the Bulb Dies
Phosphor solarization is the primary cause of tanning power loss. This process occurs as the intense heat and electrical arcing inside the glass tube chemically alter the internal phosphors. Essentially, the coating becomes "cloudy" to UV rays while remaining transparent to visible light. You might notice your tan fading or taking longer to achieve despite the bed appearing as bright as day one. It's a pragmatic reality of gas-discharge technology; heat is the enemy of performance, and every hour of operation slightly reduces the lamp's ability to penetrate the glass with tanning rays.
Comparing Traditional UV vs. Hybrid Red Light Lamps
Modern equipment often incorporates red light therapy canopies or hybrid lamps to provide a dual-action wellness experience. These hybrid systems utilize different spectrums than traditional UV-only lamps, but they are not immune to degradation. In fact, matching lamp types during a full set replacement is mandatory for consistent results. Mixing old UV lamps with new hybrid ones creates "cold spots" in the bed, leading to uneven bronzing. Hybrid lamps generally follow the same decay patterns as standard UV bulbs, meaning they require the same rigorous replacement schedule to maintain their skin rejuvenation and tanning benefits.
When you finally execute the process of how to change tanning bed bulbs, remember the 100-hour "burn-in" rule. New lamps are significantly more potent during their first 100 hours of operation. During this window, the UV output is at its peak before stabilizing into its long-term performance plateau. Failure to account for this can lead to unexpected overexposure. It's standard practice to reduce session times by approximately 20% during this initial period to ensure a safe and comfortable transition for the user.
When to Replace Tanning Bed Bulbs for Maximum Results
Calendar time is a deceptive metric for lamp maintenance. While casual users often suggest replacing bulbs every two or three years, professional results depend on precise hour tracking. Most lamps are engineered for a lifespan between 500 and 1,000 hours, depending on whether they are residential or commercial grade. The "20% rule" is the true benchmark for performance. Once UV output drops by 20%, tanning efficiency plummets. Users will notice they can no longer maintain their base color, even with maximum session times. If you are researching how to change tanning bed bulbs, it is likely because your equipment has already crossed this performance threshold.
Physical warning signs often precede a total failure. Look closely at the ends of the glass tubes for cathode darkening, which appears as distinct dark rings. This indicates the filament is nearing the end of its functional life. Frequent "short-cycling," or turning the bed on and off for very brief sessions, accelerates this degradation. It places more electrical stress on the lamp than a single, full-length session. Adhering to FDA tanning regulations ensures your equipment operates within safe irradiance limits while delivering the results your clients expect.
Tracking Your Bed's Internal Hour Meter
Modern professional units, such as the ProSun Onyx, feature integrated digital hour counters accessible through the service menu. These systems provide an exact log of operational time, removing the guesswork from maintenance. For older residential beds lacking digital displays, maintaining a manual logbook next to the bed is essential. A UV light meter is the only 100% accurate way to test output. This specialized tool measures actual irradiance, allowing you to see exactly when a lamp has lost its bronzing power.
The Danger of Mixing Old and New Bulbs
Replacing only a few bulbs at a time is a counterproductive strategy. This creates "striping," where UV distribution is uneven, resulting in inconsistent tans and visible lines on the skin. Mismatched lamps also place unnecessary electrical strain on the ballasts. The ballast must work harder to fire lamps with varying resistance levels, which can lead to premature component failure. A partial swap is usually a wasted investment. To maintain peak performance, always install a complete set of replacement tanning lamps at the same time.
When you finally execute the process of how to change tanning bed bulbs, ensure you have a full inventory ready. Swapping the entire set guarantees that every inch of the tanning surface provides uniform UV output. This methodical approach protects your ballasts and ensures the high-efficiency results that high-volume tanning environments require.
Step-by-Step: How to Change Tanning Bed Bulbs Like a Pro
Safety is your first priority. Disconnect the power source entirely before you begin. Allow the bed to cool for at least 20 minutes to prevent thermal shock to the glass or skin burns. Once the unit is cool, you can begin the process of how to change tanning bed bulbs by accessing the internal lamp bank. This stage requires patience, as rushing can lead to cracked acrylics or damaged sockets. Professional maintenance is a methodical process that rewards precision over speed.
Removing the acrylic shields is the most delicate part of the operation. Most beds utilize a series of clips, screws, or "lift and slide" tracks to secure these protectors. Aged acrylic becomes brittle over time. Handle it with extreme care to avoid hairline fractures that can compromise the safety of the bed. Store the removed sheets on a flat, padded surface away from foot traffic. While the lamps are exposed, take a moment to clean the internal reflectors with a soft, lint-free cloth. Removing dust and residue from these surfaces can improve UV reflection efficiency by up to 10%.
Professional maintenance doesn't end with the physical swap. You must reset the internal hour meter to accurately track the new lamps' effective life. On most digital units, this involves entering a service menu via a specific button sequence. Skipping this step renders your maintenance logs useless and makes it impossible to adhere to FDA regulations on tanning lamps regarding replacement schedules. Tracking these hours is the only way to ensure the bed remains within legal and functional performance limits.
Seating the New Lamps Correctly
Properly seating the new lamps ensures a reliable electrical connection. For standard Bi-pin lamps, align the pins vertically before inserting them into the socket and giving a firm 90-degree twist. You should feel or hear a distinct "click" as the lamp locks into the circuit. If you're working with RDC (Recessed Double Contact) lamps, utilize the spring-slide method by pushing one end into the spring-loaded holder until the other end clears the opposite socket. Always wear clean gloves during this process. Skin oils left on the glass create "hot spots" that can lead to premature lamp failure or uneven heating.
Inspect the lamp holders, or sockets, for any signs of melting, discoloration, or corrosion. Heat buildup from loose connections often damages these components, which can lead to flickering or the immediate failure of new bulbs. If a socket appears charred, it must be replaced before installing the new set. This proactive check prevents you from wasting expensive hardware on a faulty electrical foundation. Following these steps ensures you know exactly how to change tanning bed bulbs while maintaining the long-term health of your equipment.
The 'All Bulbs Are Equal' Myth: Choosing Replacement Lamps
Selecting hardware based on physical length alone is a major tactical error. Tanning beds are engineered to operate within specific electrical parameters defined by their ballasts. If your bed is rated for 100W lamps, installing 160W lamps won't make the bed stronger; it will likely cause the ballasts to overheat or prevent the lamps from firing correctly. Beyond the electrical load, you must consult the bed’s original Compatibility Sheet. This document ensures that your choice of replacement tanning lamps keeps the unit within FDA legal limits for UV exposure. Using non-compatible lamps in a commercial setting can lead to regulatory non-compliance and inconsistent tanning results.
Spectral output is another variable that distinguishes professional-grade lamps. Different models feature varied UVA to UVB ratios. High-UVB lamps are often marketed for faster base-building, while high-UVA lamps focus on immediate browning. Mixing these ratios within a single bed creates an unpredictable environment for the user. When learning how to change tanning bed bulbs, the goal isn't just installation but maintaining the specific performance level of the bed. Consistency across the entire lamp bank is the only way to guarantee the results your clients expect.
Bi-Pin vs. RDC: Identifying Your Connector
Identification of the connector type is the first step in the ordering process. Bi-pin lamps feature two exposed metal pins at each end that slide into a G13 socket. In contrast, RDC (Recessed Double Contact) lamps have a single, spring-loaded black plastic cap covering the contacts. These two types are not interchangeable regardless of their length. Attempting to force an RDC lamp into a Bi-pin socket will damage the hardware and void your lamp warranty. A common mistake when ordering online is assuming that all F71 lamps are Bi-pin; always verify the end type before finalizing your purchase to avoid logistical delays.
Starter Replacement: The Often Forgotten Component
Tanning starters act as the "spark plug" for your lamps. They provide the initial electrical surge required to ionize the gas inside the tube. You should replace your starters every time you install a new set of lamps. A failing starter often causes flickering, delayed ignition, or "dead" ends where the lamp glows but doesn't fully ignite. S12 starters are the industry standard for most 80W to 160W lamps. Neglecting this small, inexpensive component can lead to premature cathode failure in your brand-new lamps. Fresh starters ensure a quick, clean ignition that extends the functional life of your investment.
Ensure your equipment performs at its peak by browsing our full inventory of authorized replacement lamps and starters today.
Optimizing Your Maintenance: Beyond the Bulb Swap
Maintenance is a continuous cycle. It doesn't end when the last bulb clicks into place. Once you have mastered how to change tanning bed bulbs, you must shift your focus to the optimization phase. New lamps are significantly more aggressive during their initial 100-hour "burn-in" period. During this window, internal gases stabilize and UV output is at its absolute peak. To prevent overexposure, it's standard professional practice to reduce all session times by 20% for the first 100 hours of use. This safety protocol ensures a predictable experience for the user while the hardware reaches its long-term performance plateau.
Thermal management is equally critical to lamp longevity. Check your cooling fans immediately after a full lamp replacement. High-performance lamps generate significant heat; if your fans are clogged with dust or failing, the internal phosphors will degrade prematurely. Heat is the primary driver of solarization. Efficient airflow protects your investment and ensures the lamps maintain their irradiance levels for the full duration of their 500 to 1,000-hour rated life. If your current unit requires constant component swaps or shows signs of structural wear, it may be time to evaluate professional tanning salon equipment packages for a more efficient technology upgrade.
Acrylic Maintenance for UV Transparency
Clean acrylics are the gatekeepers of UV delivery. Dust, perspiration, and "bronzer film" can accumulate on the underside of the acrylic, blocking up to 30% of the lamp's UV output. Never use Windex or ammonia-based cleaners; these chemicals cause "crazing," or thousands of tiny internal cracks that permanently cloud the material. Use only specialized tanning bed sanitizers. For minor surface scratches that diffuse light, use a dedicated acrylic buffing compound to restore clarity. If the acrylic has turned yellow or brittle, it must be replaced. Yellowed acrylic acts as a filter that strips away the specific tanning wavelengths you just paid to install.
Resetting the Digital Maintenance Timer
Accuracy in record-keeping is a logistical necessity. Most commercial control boards require a specific button sequence to reset the "lamp hours" counter. This step is vital for tracking your next maintenance interval and is often a prerequisite for processing warranty claims with lamp manufacturers. It also ensures safety compliance with local regulations regarding equipment logs. Before your first session with the new equipment, perform a final checklist: verify all lamps are firing, ensure the acrylic is seated flush in its tracks, and confirm the cooling fans are exhausting air freely. Following this structured approach to how to change tanning bed bulbs guarantees that your equipment operates at peak commercial efficiency from the very first minute.
Maximize Your Equipment Performance Today
Mastering how to change tanning bed bulbs is the most direct path to restoring the professional bronzing results your equipment was designed to deliver. UV irradiance matters more than visible brightness. By prioritizing technical data over the deceptive glow of old lamps, you eliminate the guesswork that leads to faded results and wasted electricity. Successful maintenance relies on a complete approach; this includes tracking operational hours, replacing starters, and ensuring your acrylic shields remain transparent to specific UV wavelengths.
We are a seasoned, Authorized National Distributor committed to your operational efficiency. You can Shop Professional Replacement Tanning Lamps at Sun Tanning Store to access free shipping on most lamp kits and expert technical support for all major brands. Our team is ready to help you match the correct specifications to your existing ballasts for a seamless installation. Taking these proactive steps today ensures your equipment remains a reliable, high-performance asset for years to come. Restore your glow with confidence.
Frequently Asked Questions
Is it safe to change tanning bed bulbs myself?
Yes, performing this task is safe as long as you disconnect the power source and let the unit cool for 20 minutes. Most professional and residential equipment is designed for user-level maintenance. You must handle the glass with care to avoid breakage and wear clean gloves to prevent skin oils from creating hot spots on the new lamps.
How often should I realistically replace my tanning lamps?
You should replace lamps every 500 to 1,000 operational hours depending on the specific model's rating. Commercial environments usually hit this limit much faster than residential units. Monitoring your hour meter is the only way to ensure you aren't using lamps that have lost their bronzing power. Knowing how to change tanning bed bulbs before they reach total failure keeps your results consistent.
Can I use a different brand of bulb than what came with my bed?
Yes, you can switch brands as long as the new lamps appear on your bed’s official compatibility sheet. This document ensures the spectral output and electrical draw meet federal safety standards. Always match the wattage and connector type, such as Bi-pin or RDC, to your original equipment specifications to maintain performance.
Why are the ends of my new tanning bulbs turning black?
Dark rings at the ends are usually caused by cathode darkening or mercury deposits. This is common as lamps age, but if it happens to new bulbs, it often indicates a faulty starter or a loose connection in the socket. High heat from poor ventilation or frequent short-cycling also accelerates this visual degradation.
Do I need to replace the starters every time I change the bulbs?
You should replace your starters with every new lamp set to ensure reliable ignition. Starters are inexpensive components that act like spark plugs for the starting process. Old starters can cause flickering and damage the cathodes of your new lamps, which significantly reduces their overall functional lifespan.
What happens to my skin if I use bulbs past their effective life?
Using lamps past their effective life results in a tanning plateau where your skin no longer bronzes despite long sessions. You are essentially exposing your skin to heat and visible light without the necessary UV irradiance. This leads to wasted time and increased skin dryness without the benefit of achieving a deeper color.
How do I properly dispose of old tanning bed lamps?
You must treat old lamps as hazardous waste because they contain small amounts of mercury vapor. Never place them in standard trash or household recycling bins. Most local municipalities have specific drop-off points or hazardous waste collection days specifically for fluorescent tubes and tanning lamps.
Will 160W bulbs work in a bed designed for 100W lamps?
No, you cannot use 160W bulbs in a 100W system. The internal ballasts are specifically rated to provide a certain amount of electrical current. Overloading a 100W ballast with a 160W lamp will cause the ballast to overheat and fail prematurely. This is a critical technical detail to remember when learning how to change tanning bed bulbs correctly.